Flywheel Shooter Software for FRC
Shreyas Rana - Team 649 Software Lead - 408–816–5339
In this documentation, I will be describing how we wrote a highly efficient flywheel shooter software for the 2022 FRC Season, “Rapid React”. One of the main components of the gameplay is being able to launch large, air-filled balls into a large target. All methods described in this document have been applied to team 649’s shooter.
Some useful things to keep in mind before tuning your flywheel include the kind of hood angling that your robot has (binary vs variable), and making sure that the pressure between your hood and the flywheels provides sufficient traction to provide at least make a 3/4 to full-field shot at max speed.
Team 649 has a binary piston actuated rail hood, with 2 Colson flywheels to shoot, powered by 2 Falcons in a 4:3 gear ratio.

Feed-Forward
The first thing to do is implement a feed-forward for the flywheels. A feed-forward is basically a feedback loop that actively corrects for changes in your current value and your setpoint value. In this case, when you shoot a cargo, your flywheels will transfer their rotational kinetic energy into the ball to send it flying, and thus will lose some of their rpm. A feedforward will constantly read the flywheel’s velocity every 20ms and very rapidly bring the rpm back to the constant setpoint.
A feedforward requires a kS, kV, and kA values, the Static, Velocity, and Acceleration constants respectively. To determine these values we used SysID to characterize our values. SysID uses linear algebra and partial derivatives to determine these values.

There are too many details to go into for using SysID, but here is some good documentation on how to use SysID: https://docs.wpilib.org/en/stable/docs/software/pathplanning/system-identification/introduction.html
With hundreds of equations from multiple runs and only 3 variables, it uses a least-squares overdetermined system of equations to calculate x-hat, or the vector least-squares solution <kS, kV, kA>.
One mistake we wade was for every different rpm we wanted to run, we have to set that percent rpm as the kS value, as that is the setpoint.
Vision
We are using a limelight for computer vision, and to align to the hub in order to shoot. This year’s vision target is tricky because there are multiple little targets to align with, and can make aligning to a frequently changing target unreliable. To fix this, in addition to tuning the pipeline we made it such that the limelight triple targets, or basically considers 3 targets as one. This will take 3 of the closest targets and align exactly in the middle of them. This significantly increases the threshold of aligning to the middle of the hub to shoot precisely.
We then use a simple PID loop to aim our robot precisely in the middle of the 3 targets to automate and quicken the shooting process, and decrease human error.
However, the most important use of our limelight is determining the longitudinal distance to the hub, which will be then used to determine the “zone” that the robot is in, and then can determine a set RPM.

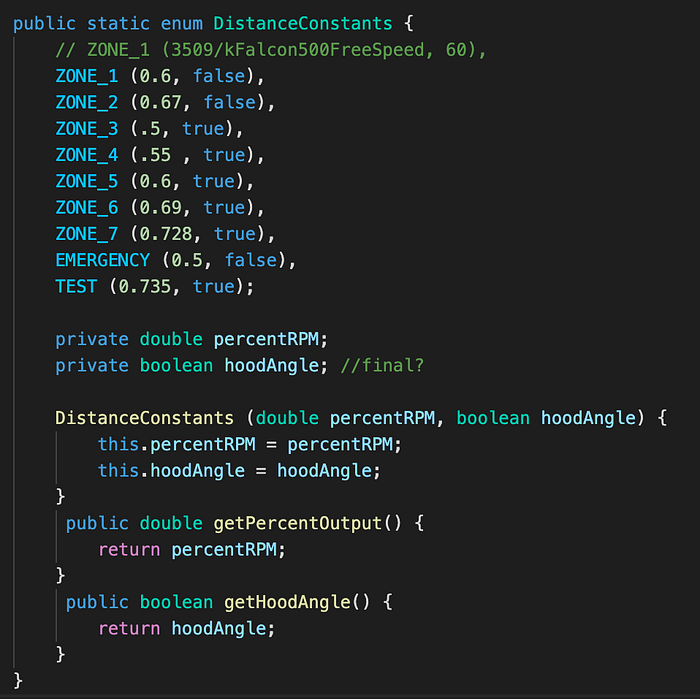
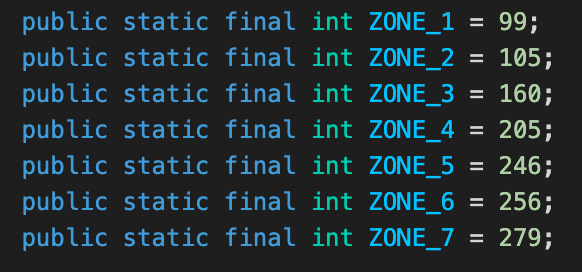
Zones and Tuning
This is where most of the tuning time will go into. The basic premise for determining zones is to enable in teleop and run at a constant RPM and move back at very incremental “Limelight Units” (yes we made up our own unit of measurement) until the shot is no longer accurate. All values such as rpm, hood angle, distance, and shooter accuracy must be stored in some table for future zone extrapolation from this data. That will be the zone, and a new zone will start when an adjustment to the rpm of hood angle is needed. You will then have to determine whether a change in rpm, hood angle, or both is necessary. Usually, a change in rpm is the best practice for our team.
This is usually a very long process, and occasionally has to be entirely redone due to changes in hardware. Here is an example of our data: https://docs.google.com/spreadsheets/d/131SGCbChTehzYI-lni8rDIIPFjplC1Duz90J6g9ixSo/edit?usp=sharing
And that’s it! If you enjoyed this guide leave a clap and let me know. Additionally you can see our code here: https://github.com/SaratogaMSET/FRC-2022